Uploading data
In Routing Workspace, you can upload routes to Track & Trace in the following two ways:
- Export the results of a planning task if you create routes using the Planning service.
- Import data from an Excel file if you set the order delivery sequence yourself.
Note
You can also upload routes to Track & Trace using the Track & Trace API. For more information, see Setting routes for the day.
Preparing data
To upload routes to Track & Trace successfully, you should know the following:
- How you want couriers to receive information about routes and send their coordinates.
- If the courier needs to call the recipient.
- Which depots will be included in the routes in Track & Trace.
Mobile apps or GPS trackers
To get information about their route and share their location, couriers can use a GPS tracker or the Yandex Courier app.
- Ask your GPS tracker provider to add data relay to the Yandex server.
- Get GPS tracker numbers from your provider.
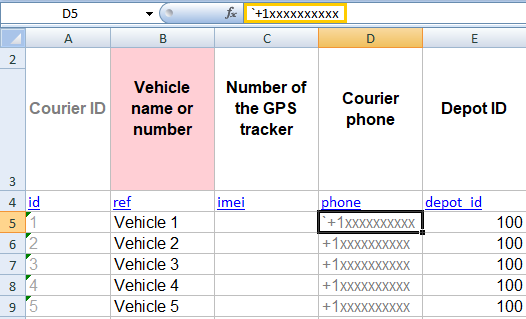
- In the Planning file, open the Vehicles sheet and add a GPS tracker number (
IMEI) column. - In the Number of the GPS tracker column, enter the numbers you received.
You can edit the GPS tracker number in the file and the Planning interface.
- In the Planning file, open the Vehicles sheet and add a Courier ID column.
- Enter a unique username for each courier.
You can edit the courier's username in the file and in the Planning interface.
If you enter the courier's phone number in +1хххххххххх format in the Courier ID and Phone number fields, they won't have to enter their username to log in to Yandex Courier.
Note
For phone numbers with the + symbol to be uploaded to Track & Trace correctly, enter the ' (single quote) symbol before the plus.
Clients' mobile phone numbers
Before departing for a delivery, the courier may need to confirm the client's availability or notify them of any delays and arrange a new delivery time.
To allow the courier to contact clients by phone, provide the clients' phone numbers. There are two ways to do this:
-
Specify the client's phone numbers on the Orders sheet. This will make the Call button appear in the Yandex Courier app.
-
On the Orders sheet, specify the client's phone number in the order comments in the format:
<a href="tel:+79123456789">Call</a>. To specify the extension number, use separators (,,;,*, or#):<a href="tel:+79123456789,12">Call</a>. The Call link will appear in the Logistics coordinator's note field in the app, enabling the courier to contact the client.
Link in the order comment
If the courier needs additional order information, such as parking rules at the client's address, you can add a link in the order comment.
To do this, in the order comment on the Orders sheet, specify a link like this: <a href="https://red-rose.com">Parking rules</a>. The Parking rules link will appear in the Logistics coordinator's note field in the app, enabling the courier to find and read the necessary information.
Depot
Alert
To upload a route to Track & Trace successfully, be sure to specify the depot in the company settings and the Planning file (task).
- Specify the depot number:
- In the Planning file on the Depot sheet in the Depot number column.
- In the Planning task on the Depots tab.
- Upload the planning file or fill in the data in the interface and run planning.
Manual route configuration
Alert
Make sure routes are created for all orders specified on the Orders sheet. Otherwise, the system returns an error when importing data. See an example of a route file that's filled out correctly.
If you set the order delivery sequence yourself, add several more settings in the planning file:
- Go to the Routes sheet and fill out the following columns:
- Vehicle ID
- Shift
- Order number
- Match the order number with the Vehicle ID and the Shift during which the courier delivers the order.
- Set the order delivery sequence.
Export to Track & Trace
Once you've planned and edited the routes, export them to Track & Trace for tracking.
Warning
Cross-docking solutions are not exported to Track & Trace.
Export via Routing Workspace
- In the upper-right corner of the screen, click Export.
- Select Track & Trace.
- Select the status to create orders with.
- Click Upload to Track & Trace → View.
- You can see the planned routes in the Dashboard section.
For more information, see Export.
If you don't need to track some of the routes, filter or hide them. For more information, see Partial export.
After that:
- In the upper-right corner of the screen, click Export.
- Enable Only visible routes.
- Select Track & Trace.
- Select the status to create orders with.
- Click Upload to Track & Trace → View.
- You can see the planned routes in the Dashboard section.
The date may be automatically added to the order number when exporting planning results to Track & Trace. This happens when the new order number matches the one that already exists in Track & Trace.
For example, if Track & Trace already has an order with number Order 1, the card of the new order will have the number Order 1 YYYY-MM-DD.
Export via the API
Note
Only a manager or company administrator can export the solution.
To export the solution from Planning to Track & Trace via the API, send a request to the routes-import resource.
Request:
cURL
curl -H "Content-Type: application/json" -H "Authorization: OAuth <your-token>" -X POST https://courier.yandex.ru/api/v2/companies/<your-company-id>/routes:vrp-task-import/?vrp_task_id=<vrp_task_id>
cURL
curl -H "Content-Type: application/json" -H "Authorization: OAuth <your-OAuth-token>" -X POST https://courier.yandex.ru/api/v2/companies/<your-company-id>/routes:vrp-task-import/?vrp_task_id=<vrp_task_id>
where <vrp_task_id> is the solution ID from Planning.
Result:
{
  "id": "<vrp_task_import_id>",
  "status": "IN_PROGRESS",
  "create_time": "<creation-time>",
  "update_time": "<update-time>"
}
where <vrp_task_import_id> is the ID of the exported solution in Track & Trace.
To obtain the export result, send a GET request:
Request:
cURL
curl -H "Content-Type: application/json" -H "Authorization: OAuth <your-token>" -X GET http://courier.yandex.ru/api/v2/companies/<your-company-id>/routes:vrp-task-import/<vrp_task_import_id>
cURL
curl -H "Content-Type: application/json" -H "Authorization: OAuth <your-OAuth-token>" -X GET http://courier.yandex.ru/api/v2/companies/<your-company-id>/routes:vrp-task-import/<vrp_task_import_id>
where <vrp_task_import_id> is the ID of the exported solution in Track & Trace.
Depending on the status of the request, you'll receive one of the results:
-
Request in progress:
{ "id": "<vrp_task_import_id>", "status": "IN_PROGRESS", "create_time": "<creation-time>", "update_time": "<update_time>" } -
Request completed successfully:
{
  "id": "<vrp_task_import_id>",
  "status": "SUCCESS",
  "create_time": "<creation-time>",
  "update_time": "<update_time>",
  "result": {
    "routes": [...]
    }
}
where the
routesarray contains the created routes. -
An error occurred while executing the request:
{
  "id": "<vrp_task_import_id>",
  "status": "ERROR",
  "create_time": "<creation-time>",
  "update_time": "<update_time>",
  "error": {
    "message": "<error-description>"
    }
}
Special considerations when exporting via the API:
- Requests from one company are executed sequentially in the order they're received.
- If a request ends with an error (for example, the specified depot doesn't exist), the response will return an error message, and the solution will not be exported.
Import from Excel
Import manually created routes to Track & Trace:
-
In the left menu of Routing Workspace, select Track & Trace → Dashboard.
-
In the upper-right corner, click Import. The import interface opens.
-
In the upper-left corner, click Upload file and upload the necessary file from your computer.
-
Check the system notifications on all tabs and correct the data if necessary.
If the order numbers are duplicated, the system will suggest solutions. If you select Keep duplicates and rename numbers in the new route, the duplicate orders will be renamed. The planning date in the
YYYY-MM-DDformat will be added to their name. -
Go to the Settings tab:
- Select the date when couriers must perform these routes.
- Select the necessary order status.
-
In the lower-left corner, click Import.
-
You can see the planned routes in the Dashboard section.
Populating Excel files
Orders sheet
Orders by all routes.
|
Field |
Description |
|
|
Order number in your system. The value must be unique for the entire sheet and meet the requirements. The maximum length is 80 characters. |
|
|
Order delivery point latitude. |
|
|
Order delivery point longitude. |
|
|
Point name/Client name. Displayed in the app. For example, The maximum length is 1023 characters. |
|
|
The address of the location. It is displayed in the app. The maximum length is 1023 characters. |
|
|
Phone number for an SMS notification of the courier's arrival. If there are multiple numbers separated by commas, the Yandex Courier app lets the courier select one of them. No SMS notification is sent in this case. The maximum length is 80 characters. You can leave this field empty. |
|
|
Delivery time window. All routes are uploaded as of the shipment date. For example, the shipment date is May 1. If the delivery window is May 2 from 9:00 to 10:00, specify the window in |
|
|
Handling time at an address, in seconds. This includes time for document delivery or parking. It affects the time when the delivery status is registered. |
|
|
Order handling time, in seconds. This includes time for delivering the order. |
|
|
Order weight, kg. |
|
|
Order comment. There is no limit on the maximum length. |
|
|
IDs of the companies that have access to the order. Learn more |
|
|
Aliases of the companies that have access to the order. Learn more |
|
|
External number of the order's client. |
Vehicles sheet
Vehicle parameters.
|
Field |
Description |
|
|
Username used to access the mobile app. A username can be the courier's identification number, the vehicle's license plate, the courier's phone number, and so on. The maximum length is 80 characters. |
|
|
Vehicle number or any other unique identifier of the vehicle. Displayed in the interface. The maximum length is 255 characters. |
|
|
GPS tracker number (if available). Accepts a value from 1 to 9223372036854775807. |
|
|
Courier's phone number (if available). The maximum length is 80 characters. |
|
|
ID of the depot (the |
|
|
Start and end time of the shift. Tracking starts after the shift start time. For more information, see Route tracking. |
|
|
If the vehicles don't make second runs on the current day, this field can be left empty. If they do, specify the time window for the second run. |
Depot sheet
Depot parameters. If there are multiple depots, fill in a separate row for each depot.
|
Field |
Description |
|
|
Depot number. The maximum length is 80 characters. |
|
|
Additional depot ID. The maximum length is 1023 characters. |
|
|
Depot name. The maximum length is 1023 characters. |
|
|
Depot latitude. |
|
|
Depot longitude. |
|
|
Depot address. The maximum length is 1023 characters. |
|
|
Depot working hours. Does not affect tracking. You can specify |
Routes sheet
A binding between orders and vehicles.
|
Field |
Description |
|
|
Vehicle ID ( |
|
|
Shift number. If the vehicles don't make second runs on the current day, set |
|
|
Order number ( |
|
|
Route ID. Used if a client has their own unique |
Working with duplicates
Duplicates are orders with duplicate numbers.
If there are duplicates in the route that you import from Excel, Track & Trace will warn you about this. Notifications and possible actions will be shown in the Import routes window on the Orders tab.
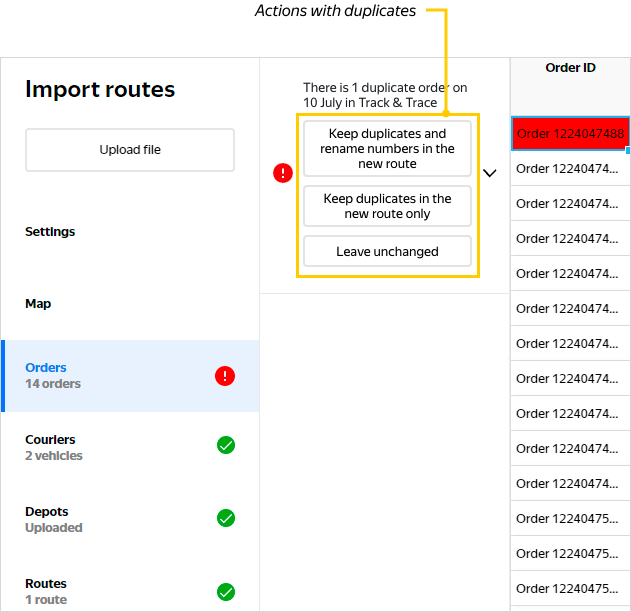
To import data, select one of the following actions:
Keep duplicates and rename numbers in the new route
Duplicate orders will be renamed so that the route date is added to the duplicate number.
Example
As of July 1, you need to import a route where Order 1224047488 is a duplicate of the order from the route for June 30.
Once imported with the Keep duplicates and rename numbers in the new route condition, the order from the June 30 route still has the number Order 1224047488, while the number of the order from the July 1 route is changed to Order 1224047488 2021-07-01.
Keep duplicates in the new route only
A duplicate is moved from the old to the new route.
Example
As of July 1, you need to import a route where Order 1224047488 is a duplicate of the order from the route for June 30.
Once imported with the Keep duplicates in the new route only condition, the order with the number Order 1224047488 from the June 30 route is deleted, while its duplicate remains in the July 1 route with the number unchanged.
Leave unchanged
This option means that the system doesn't perform any actions with duplicates.
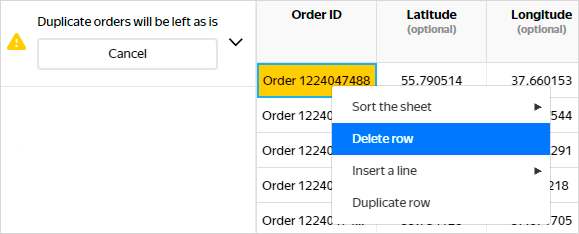
If you try to import a route immediately after selecting this option, Track & Trace returns an error saying "Couldn't send imported data". First, replace duplicate orders on the Orders tab.
To avoid this error, manually delete the duplicate from Track & Trace before importing the route:
-
Right-click on the row with the duplicate.
-
Click Delete row.
-
Go to the Routes tab.
-
In the route table, delete the row with the duplicate.
-
Click Import.
If you changed your mind and want to undo an action, click Cancel. You'll return to choosing an action with duplicates again.
Order statuses when uploading routes
When uploading routes to Track & Trace, you need to select a status for newly created orders.
| Status | When it's assigned | Buttons in the Yandex Courier app |
|---|---|---|
| Not approved | If the courier needs to call the recipient before going to the delivery address. | The Optimize route and Confirm order delivery buttons are only available after a call is made. |
| Approved | If there is no need to make a call before delivering the order. | All buttons are available at once. |
Uploading additional routes
You can upload routes for a date that already has planned orders (for example, in case of additional planning).
When you add new routes for a day for which they already exist, you receive a warning:
- When exporting data from Planning: In the export to Track & Trace window.
- In the import interface: On the Routes tab.
Then you need to choose the appropriate action.
|
Option |
Action |
|
Only add new routes |
All old routes remain and new ones are uploaded. Limitation This option can be used when the routes you are uploading do not include any orders whose IDs are already present in Track & Trace. |
|
Replace all |
All old routes are deleted and new ones are added. |
|
Replace all except routes in progress |
Only routes that have not been started yet are deleted. New routes are uploaded. |
Troubleshooting
Most often, when exporting or importing data, the system warns you about issues related to order IDs or depot numbers. You can resolve these issues both in the Planning file and the interface.
Below is a table with their possible reasons and ways to resolve them.
|
Issue |
Possible cause |
Solution |
|
Order with ID <order_id> is already in Track & Trace |
|
In the Export solution window, click Duplicate repeat orders. These orders will have their numbers changed automatically, with the route date added at the end of |
|
Depot with number <depot_id> not found |
|
|