Geofence reference
What are geofences?
A geofence is an area bounded by coordinates.
Geofences can overlap, have internal empty geofences, and be nested.
Orders are automatically placed in a geofence if their coordinates are located in the geofence area. If the order falls in a location where geofences overlap, then the optimal solution is chosen automatically when planning.
A vehicle can be assigned to specific geofences. In this case, the vehicle can't be assigned orders from other geofences. If there are no geofences set for the vehicle, then the vehicle can be assigned orders that don't fall in any geofence.
Alert
The geofence master data is created for each company.
Why use geofences?
- Delivery quality improves as couriers work with regular clients in geofences assigned to them.
- You can use geofences to set payment rates for couriers. For example, orders within the city should be distributed to your own couriers and orders outside the city to third-party couriers, or vice versa.
- You can restrict the use of vehicles with certain dimensions or without special passes in the city center (the presence of a pass is marked with a tag).
- With geofences, you can minimize delivery time disruptions by taking the road features into account. For example, you can exclude roads of poor quality from geofences or build geofences on different sides of a river or a railway.
- You can use incompatible geofences to distribute couriers among destinations based on the payment rates. This is important for large manufacturers and transport companies.
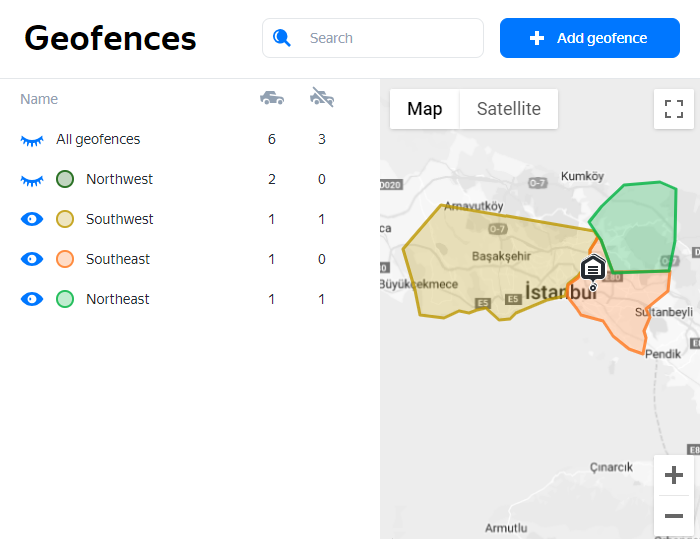
Viewing geofences
To view the list of geofences:
- Open Routing Workspace.
- Go to Master data → Geofences.
The column shows the number of vehicles in the geofence that are available for orders. The column shows the number of vehicles that are not allowed to take orders in the geofence.
To sort geofences, click the column header.
Use and to hide and show geofences on the map.. A geofence being hidden or shown in master data doesn't affect the use of this geofence during route planning.
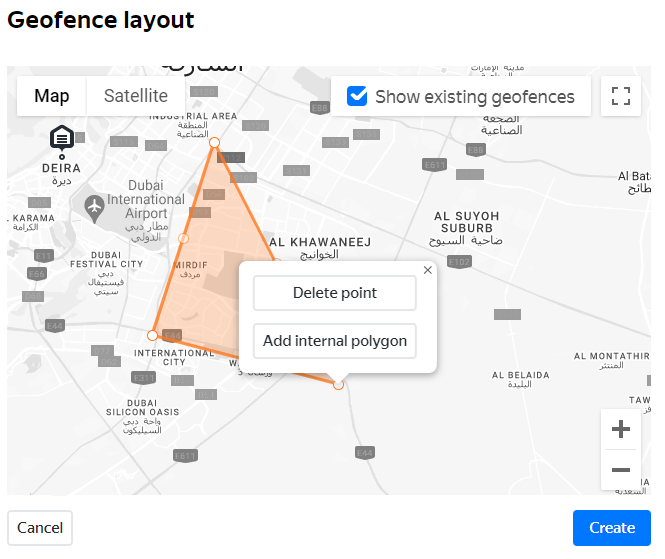
Adding a geofence
- In Master data → Geofences, click Add geofence.
- In the window that opens, enter the geofence name and click Next.
- Choose the desired map scale.
- To define the geofence polygon, left-click on it. Use the points to build a polygon.
- Clicking on the point again opens a drop-down menu with the ability to edit and add an internal polygon.
- To view previously created geofences on the map, choose Show existing geofences in the upper-right corner.
- When you're finished drawing the polygons, click Create.
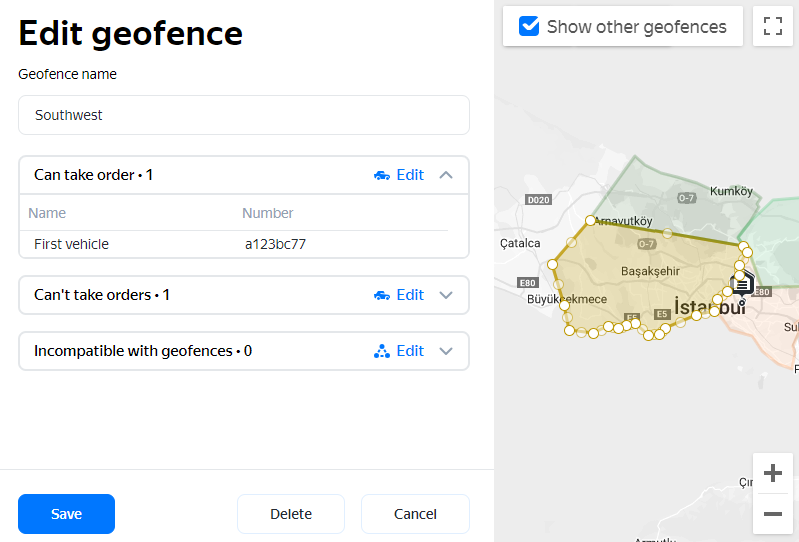
Editing and deleting geofences
Note
Managers can edit and delete only those geofences that they created themselves. Administrators can edit and delete any geofences. For more information, see User rights.
To edit a geofence, click its name. In Edit geofence mode, you can:
- Change the geofence name.
- Specify which vehicles can and can't take orders from this geofence.
- Specify incompatible geofences.
- Set the geofence color.
- Change the geofence boundaries. Drag the points with the mouse and remove extra points using the drop-down menu.
- Create an internal polygon. Click one of the boundary points and choose Add internal polygon from the drop-down menu.
- Delete a geofence. Click Delete and confirm the deletion in the window that opens.
Alert
Geofence names must be unique. If you try to create a geofence with a name that already exists in the list, you will see a warning.
Geofence search
To search for a geofence, use the Search window in the upper-right corner.