Working with the resulting solution
When automatic routing is complete, you can view and edit the results in the Planning section.
Each solution has a unique task_id, which is given in the URL:
https://yandex.com/courier/companies/<company_id>/depots/all/mvrp/<task_id>,
where company_id is the company ID.
To open the solution later, save the address from the browser address bar.
Note
The resulting solution can also be viewed on mvrp-map.
Page elements
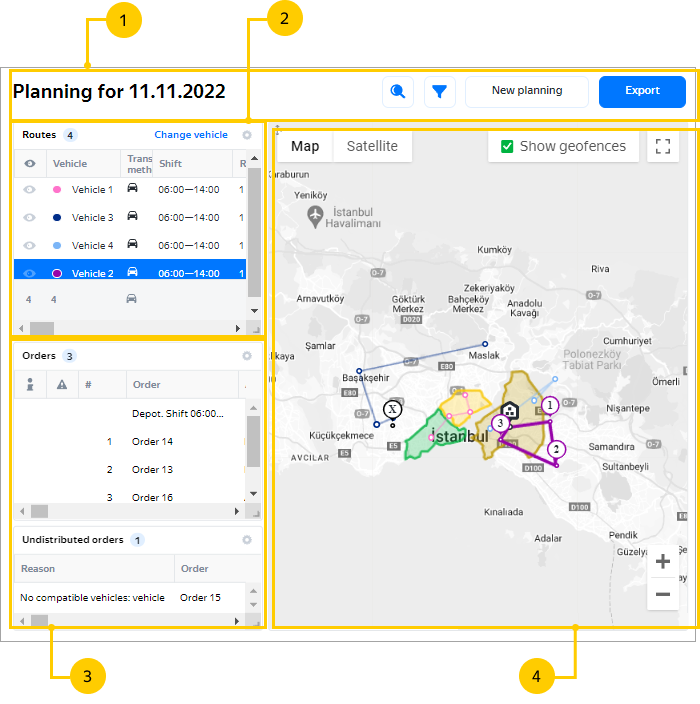
The page for working with the resulting solution has the following blocks:
- Control panel: General actions.
- Routes: Route metrics and final indicators.
- Orders and Unassigned orders: Orders that were included in the route and orders that couldn't be included.
- Map: A geographical representation of the routes and unassigned orders.
You can change the block layout:
Position the block
Hover over the upper-left corner of the block, and left-click and drag the block to the desired location.
Adjust the size
Use the control element in the lower-right corner of the block.
Change width of columns
To adjust the column width, move the borders of the column header.
Reorder columns and choose which ones to show
Click in the upper-right corner of the block.
- To adjust the column order, drag the column name to the desired position in the list.
- To hide a column, disable the option with the relevant name.
- To return to the standard settings, click Reset.
Control panel
New planning
Starts a new planning task. To avoid losing the current solution's results, save the task_id before starting a new planning task.
Date
The date that the solution is planned for.
Search
Use the search to go to an object: select an order or a route from the drop-down list, and it will be highlighted in the blocks. If you select a depot, then Routes block will show only the routes where the courier visits that depot.
Filter
Appears if the Vehicle tags option was used during planning.
The filter lists the values from the Vehicle properties field in the Routes table (equivalent to tags). To display routes that match specific vehicle properties, select the relevant value. You can select multiple values. As a result, data is filtered across all blocks.
Export
Used for exporting solutions.
Routes
When you hover over a route, the map will display a tooltip with vehicle information and order properties: load by weight, volume, and capacity (cargo units).
: Comments on the route. Hover over the icon to see the comments.
: Hide the route on the map. Clicking it in the table header will hide all routes.
: There's additional information about the route. Hover over the icon to see the comments.
Example
When a task has planned routes, the icon will appear if:
- A planned route was modified (orders added, removed, or moved to another run). The route will be marked "Updated route" and highlighted in yellow.
- A new route was added that wasn't included in the planned routes. The icon "New route" will appear. The route won't be highlighted in color.
: Switch the route display mode: simple straight lines or roads. To enable this feature, contact technical support.
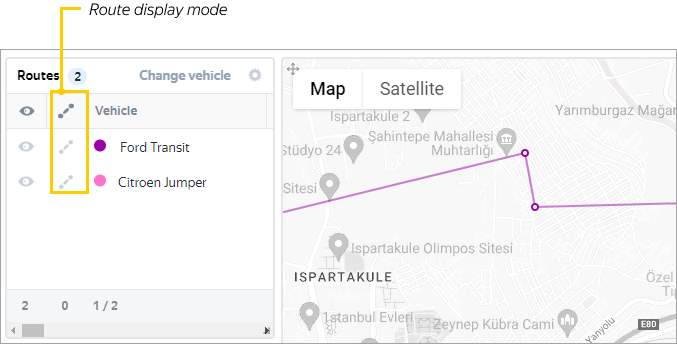
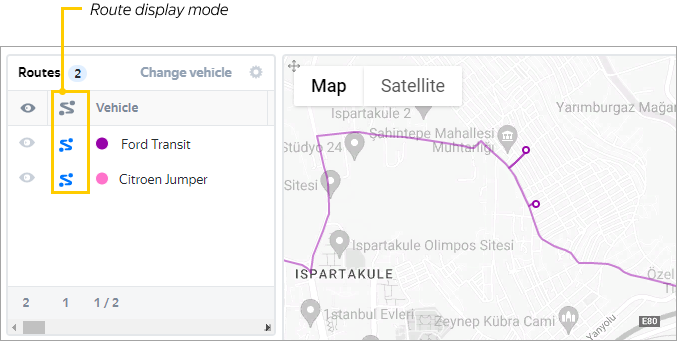
Enabling road display mode for a route
To see how your route is plotted along the roads, click in the Routes tab.
You can also toggle road display mode by exporting your solution. Use this method if you encounter the error "You don't have the rights to view results". To do this:
-
Open the desired route in Routing Workspace.
-
In the upper-right corner, click Export → JSON.
-
Wait for the buttons to activate.
-
Select where you want to view the route:
-
Click Map.
-
The solution opens on
mvrp-map. -
Click to toggle road display mode.
-
Close the export window.
-
Go to Planning → History.
-
Open the last Export to system (JSON) solution.
-
Click to toggle road display mode.
Transferring a route
If you want to transfer a planned route to another vehicle, select the route from the list and click Change vehicle. You can transfer if the following conditions are met:
-
If the original vehicle has depots specified in
depot_id(with no separation between first, intermediate, and last), you can transfer its route to:- A vehicle to which a route has already been assigned, but only if it has the same depots specified for it as the original vehicle.
- A free vehicle, if the depots of the original vehicle are specified for it, among others.
-
If the original vehicle has the first depots (
starting_depot_id), intermediate depots (middle_depot_id), and last depots (ending_depot_id) specified for it, you can transfer its route to:- A vehicle to which a route has already been assigned, but only if it has the same first, intermediate, and last depots specified for it as the original vehicle.
- A free vehicle, if the depots of the original vehicle (first, intermediate, and last) are specified for it, among others.
-
You can transfer a route back to the original vehicle only if the original vehicle has all the same depots specified for it as the replacement vehicle.
Orders and Unassigned orders
When you hover over an order, the map will display a tooltip with information about the vehicle, shift time window, order number, client, and order properties: load by weight, volume, and capacity (cargo units).
: Comments on the order. Hover over the icon to see the comments.
: There's additional information about the route. Hover over the icon to see the comments.
Example
If a planned route was assigned to a courier and a new order is added to that route, the "New order" icon will appear. The order will be highlighted in yellow.
: Hide an unassigned order on the map. If you click the icon in the table header, all unassigned orders will be hidden.
Map
Map icons are explained below. A number on a location represents its number in the sequence of route locations.
To show or hide the geofences set during planning, use the Show geofences option in the upper-right corner of the map. Enabling this option will display only the geofences that:
-
Participate in the solution.
-
Are specified in the Excel file on the sheets:
-
Vehicles in the fields:
- Allowed geofences (
vehicles.allowed_zonesin the API). - Forbidden geofences (
vehicles.forbidden_zonesin the API). - Optional geofences (
vehicles.optional_zonesin the API).
- Allowed geofences (
-
Options in the fields:
- Excluded geofences (
options.avoid_zonesin the API). - Incompatible geofences (
options.incompatible_zonesin the API).
- Excluded geofences (
-
Geofences that haven't been added to the company's data but were specified during planning and meet the conditions above will still be displayed in the resulting solution.
The values of the field Incompatible geofences (options.incompatible_zones) can be added to the API request by the user or automatically retrieved from the list.
Map icons
: Depot, depot.
: Cross-docking depot, cross dock.
: Delivery, delivery.
: Pickup, pickup.
: Drop-off, drop_off.
: A start or end point that isn't a depot, garage.
: Breaks, breaks.
: Hotspot for dense routes.
: Unassigned order.
: A point that will be visited by several couriers. The number of colors represents the number of routes that intersect.
: A point where the trailer is coupled or decoupled.
: A point where you can perform reloading.
: A point where trailers can't enter.
Displaying routes on the map
If a courier starts a route:
-
From a location with the
garagetype, the route line is displayed from this location to the first order or depot. -
From a depot, the route line from the depot to the first order won't be displayed.
If a courier ends a route:
-
In a location with the
garagetype, the route line is displayed from the last order or the depot to this location. -
In a depot, the route line from the last order to the depot won't be displayed.
Viewing the solution
To go to an order or route, select the object on the map or in the table. The order or route that you select will be highlighted in all possible page blocks.
You can also use the Search field to open a specific object. Select an order or route in the drop-down list, and it will be highlighted in the blocks. The search is performed by the following fields:
For orders (including unassigned orders)
- Number
- Name
- Address
- Recipient
- Comment
- Tags (mandatory and optional)
- Properties
For couriers and vehicles
- Name
- Geofences (permitted and prohibited)
- Properties
If you select a depot, then Routes block will show only the routes where the courier visits that depot.
If multiple routes have the same destination, they are marked with a multicolored circle on the map. The number of colors represents the number of routes that intersect. For example,  represents a location that will be visited by two couriers.
Click the icon in the route's row in the table to hide it from the map. To hide all routes except the highlighted route, click in the table header.
Routes and orders can also be filtered by tag, provided they were set during planning. To do this, use the filter button on the control panel.
If there are comments for the route or order, the icon is displayed in the table row. Hover over it to see the comments.
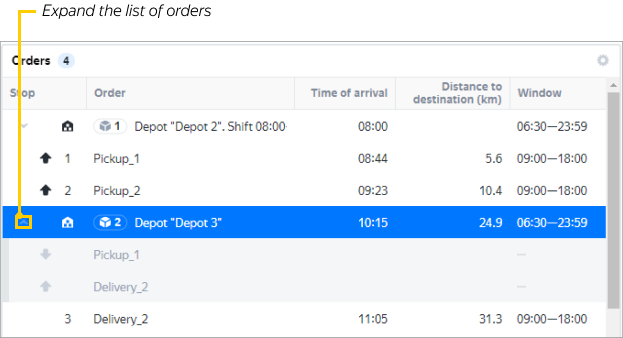
To view the list of orders that are to be picked up from or delivered to a depot, click the arrow. The number of orders is indicated on the icon next to the depot name.
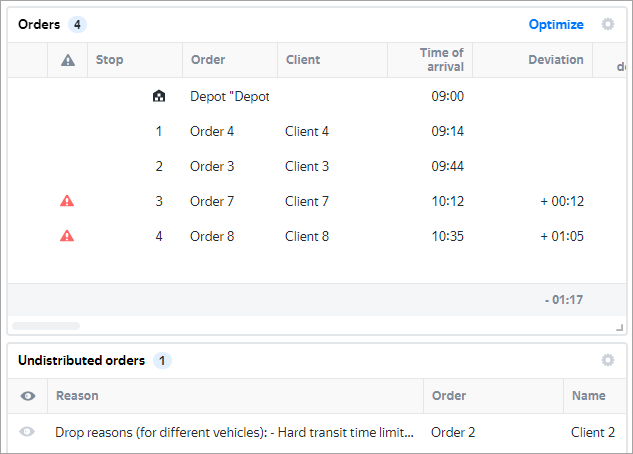
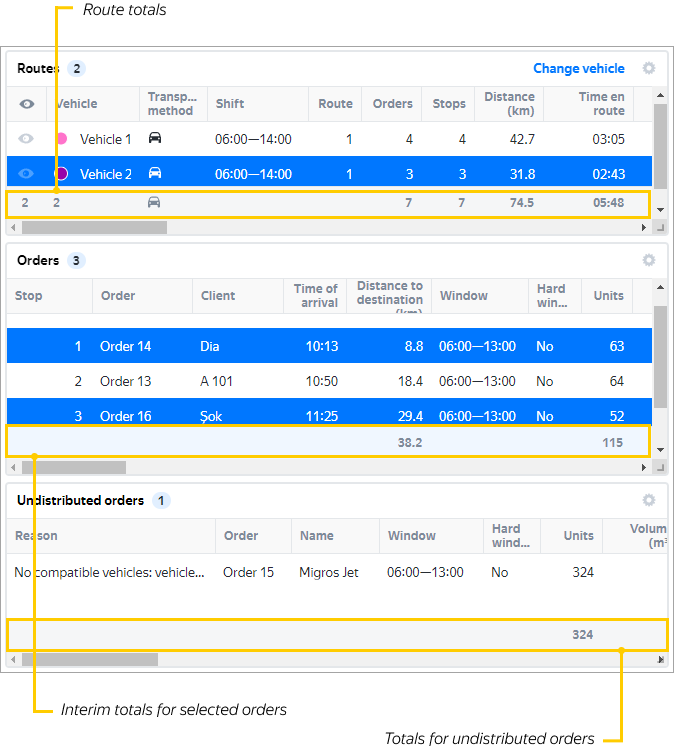
Totals for routes and orders are displayed in the tables' respective rows. For the Orders and Unassigned orders tables, you can also view interim totals for part of the orders. To do this, select the rows you need. To select multiple different rows, press and hold Ctrl. To select consecutive rows, press and hold Shift, then select the first and last row of the range you need.
Cost with penalties
The Cost with penalties (units) column is hidden by default. You can unhide it in the table view settings.
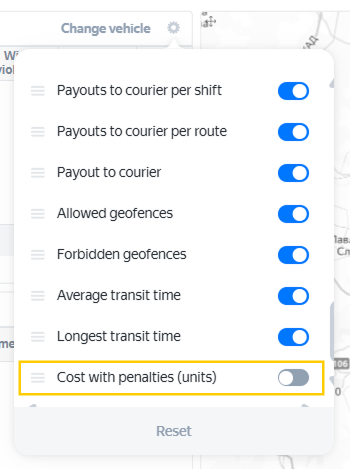
The column shows the cost for each route total_cost_with_penalty taking into account the penalties for this route. But the sum of these values across all routes may not match the metric total_cost_with_penalty for the overall solution, as it also takes into account penalties for violating routing options.
For example, the total cost of the solution includes penalties for unassigned orders or imbalances between routes. You can view the total cost of the solution, including penalties, in the API response.
Editing a solution
You can change the planning result:
Exclude an order from the route
Drag the row from the Orders table to the Unassigned orders table.
Include an unassigned order in the route
- Tables: click the route in the table or on the map. Drag the row from the Unassigned orders table to the Orders table.
- Map: drag the unassigned order's map icon to the target route.
Assign a route to another vehicle
Highlight the vehicle in the Routes table and click Change vehicle. In the window that opens, choose the vehicle.
If the original and selected vehicle have the same number of shifts, the order sequence is saved. Otherwise, the sequence can be optimized with a warning: "Shifts are different, the route can be rearranged when replacing the vehicle".
You can't assign one vehicle instead of another if they're linked to different depots. For example, if the vehicles on the sheet Vehicles have different depot_id values, or if the first vehicle has a depot_id and the second one has a starting_depot_id, middle_depot_id, or ending_depot_id. For more information about linking vehicles to depots, see Start from one of multiple depots.
Move an order from one route to another
-
Tables: drag an object from the Orders table to the Routes table in the row of the target route.
-
Map: drag the order point to the desired route.
To drag multiple items at once, select them first. To select multiple different rows, press and hold Ctrl. To select consecutive rows, press and hold Shift, then select the first and last row of the range you need.
After each edit, the summary indicators are recalculated. Metric changes are displayed in the Routes table. If an indicator has improved compared to the initial planning result, the difference is highlighted green. If it has degraded, it's highlighted red.
Every time the results change, a new task_id solution ID is generated. Save the page address so you can resume work on the edited version later. The original solution won't change, and you can still go back to it via its link.
Note
Your route is optimized for current traffic conditions, considering factors such as congestion and road closures. If you need to revisit this route later, we recommend planning it again rather than editing the existing one.
Solution link parameters
To highlight specific routes in a solution, you can specify parameter values when linking the solution:
https://yandex.com/courier/companies/<company_id>/depots/all/mvrp/<task_id>?<parameters and their values>
.
When specifying multiple parameters, add them using &. In addition to specifying a single value for a parameter, you can also specify a value array by adding its elements with %2C, which corresponds to a comma.
Available parameters:
activeVehicle=<courier id>: Highlight a courier's routes.hide=<courier id>orhide=<courier id array>: Hide a courier's or multiple couriers' routes.hide=*orhide=all: Hide all routes.hide=all&showHidden=<courier id>orhide=all&showHidden=<courier id array>: Hide all routes except for those belonging to the specified courier (couriers).showPath=<courier id>orshowPath=activeVehicle: Display a laid over roads route for the specified or highlighted courier (laid over roads routing needs to be enabled for the company).
Example 1
Hide routes for the courier whose id = 2:
https://yandex.com/courier/companies/<company_id>/depots/all/mvrp/<task_id>?hide=2
Example 2
Hide all routes except for those belonging to couriers 2 and 3:
https://yandex.com/courier/companies/<company_id>/depots/all/mvrp/<task_id>?hide=all&showHidden=2%2C3
Example 3
Highlight and display laid over roads route for courier 2:
https://yandex.com/courier/companies/<company_id>/depots/all/mvrp/<task_id>?activeVehicle=2&showPath=2