Vehicle properties
Orders in RouteQ can be delivered by regular vehicles or couriers traveling on foot or by public transit. Vehicles and couriers share the same set of properties.
The vehicles field is used in the request to determine the vehicle or courier.
Vehicle or courier ID
Each vehicle or courier must have a unique numeric or string ID set in the id field. IDs must be unique within a single service request. They will be used as the usernames of the couriers when exporting data to Track & Trace.
You can also specify the vehicle's or the courier's numeric or string ID from your tracking system in the ref field and the courier's mobile phone number in the phone field so that they can be contacted from Track & Trace.
GPS tracker number
You can use the imei parameter to specify the number of the vehicle's GPS tracker. It's sent to Track & Trace during export and is used to transmit order status and courier location data.
For more information, see Setting up data transfer from devices.
Transportation method
When building routes, it is assumed by default that a courier uses a passenger car for delivery (load capacity less than 2.5 tons). To specify delivery on foot, by truck, or by public transit, use the vehicle.routing_mode parameter. If all couriers have the same delivery method, you can use the routing option options.routing_mode.
Note
The vehicle.routing_mode parameter has a higher priority than the options.routing_mode parameter.
Possible values:
-
driving: The default method, routing for vehicles whose load capacity is less than 2.5 tons. -
truck: Routing for trucks whose default load capacity starts at 2.5 tons. You can specify additional parameters in vehicle properties. When planning for this transportation method, the algorithm takes into account road signs with cargo vehicle restrictions and the Moscow cargo frame restrictions. -
walking: A pedestrian route. The route uses only roads that can be walked. -
transit: A route that includes traveling by public transit and walking from the public transit stop to the delivery location. The real public transit timetable isn't taken into account, but it's considered that:-
Getting to the destination by public transit is possible.
-
The courier arrives at the stop and immediately gets into the transport.
-
For couriers who use bicycles or scooters, specify the transportation method as on foot (routing_mode = walking) and use the speed adjustment factor (travel_time_multiplier). We recommend personalizing adjustment factors for each individual courier. For example, using the Plan/Fact report, you can compare the actual delivery time for a courier on a bicycle or scooter with the planned walking time.
Example 1
The example below uses the transit transportation method for all couriers. In the result, couriers deliver orders using public transit with the optimal order allocation.
API request (JSON) ⋅ API response ⋅ View on map
Note
For the built routes, the mileage is specified only for the distances that couriers walk. The distances traveled by public transit are taken into account for optimization purposes, but are not counted in metrics.
Example 2
The example below uses the transit travel method for one courier and the driving method for another courier. Orders are distributed among couriers so that the vehicle delivers to points further away from public transit stops or from each other.
API request (JSON) ⋅ API response ⋅ View on map
Vehicle or courier capacity
In RouteQ you can define the vehicle capacity in terms of the maximum weight or cargo the vehicle/courier can transport over a single route.
To determine the vehicle or courier carrying capacity, use the capacity field (you can specify just one option):
-
capacity.units: Number of units (pallets, boxes, kegs). -
capacity.weight_kg: Weight in kilograms or bulk weight. -
capacity.volume: The volume, which is measured in cubic meters and set as the product of dimensions:-
capacity.volume.width_m: Width in meters. -
capacity.volume.depth_m: Depth in meters. -
capacity.volume.height_m: Height in meters.
If values are unknown, use
capacity.volume_cbm. -
-
capacity.volume_cbm: Volume in cubic meters.
If the vehicle has both size and volume specified, capacity.volume defines the dimensions and capacity.volume_cbm defines the carrying capacity.
For more information about weight determination, see Weight and volume.
Note
Please note that if the order weight is set in kilograms or as a volume weight, the vehicle capacity must be set in the same units. Similarly, if the order weight is set as the number of units, the vehicle capacity must specify the maximum number of units in each vehicle.
Additionally, you can set the maximum load of a vehicle as a percentage of the specified load capacity. To do this, use the limits request field:
-
limits.volume_perc: A percentage of the value specified incapacity.volume.width_m*capacity.volume.depth_m*capacity.volume.height_m. -
limits.weight_perc: A percentage of the value specified incapacity.weight_kg. -
limits.volume_perc: A percentage of the value specified incapacity.units.
To indicate that overload is allowed relative to a given value, specify a value greater than 100. To leave spare load capacity, for example, to allow for the inaccurate estimation of order dimensions, specify a value less than 100. For example, a value of 110 allows for 10% overload and a value of 90 allows for a maximum load of 90% of the specified load capacity.
The vehicle capacity (based on the limits) is a hard restriction that won't be violated. Note that, when calculating the vehicle load, the system takes into account the orders for pickup and delivery. For more information, see Pickup and delivery.
Note
You can use the vehicle capacity to indirectly manage the number of orders that should be added to it. For example, if you set the volume per order to 1 unit (regardless of the actual size of the order) and the vehicle capacity to 10 units, then each vehicle will be assigned no more than 10 orders.
Example
There are two vehicles with a load capacity of 1.5 tons (Vehicle 1) and 3 tons (Vehicle 2) and three orders for delivery with a weight of 1 ton, 1.2 tons, and 1.4 tons, respectively.
When optimizing routes, the 1.2-ton order is placed in Vehicle 1 and the 1-ton and 1.4-ton orders are placed in Vehicle 2.
API request (JSON) ⋅ API response ⋅ View on map
Custom capacity units
A custom unit restricts the capacity of the vehicle according to the custom unit of measurement specified for orders.
You can set several custom capacity units for vehicles. Each of them should have its own ordinal number N (numbering starts from 0). Each unit is described by two parameters:
-
capacity.custom.N.name: Name of the custom unit. -
capacity.custom.N.size: Vehicle capacity in custom units.
By default, the capacity is not limited by the parameter capacity.custom.N.size.
Alert
The name of the custom capacity unit for the vehicle should match the one given for the order.
If custom capacity units are specified for orders or explicitly specified for some vehicles, but not for others, then the vehicles with unspecified units will be taken to have unlimited carrying capacity in custom units.
Example of filling in Excel file sheets for a custom price parameter (order cost):
Order cost
|
|
|
|
|
100 |
Total order cost
|
|
|
|
|
1000 |
Example 1.1
4 vehicles deliver 16 orders. Weight, volume, and load capacity (number of units) are specified for the vehicles. Custom units have been set for orders (to limit the cost, location.shipment_size.custom.0) and for the vehicles (to limit the total cost of transported orders, vehicle.capacity.custom.0).
There are 2 vehicles transporting 1 order each. However, their weight, volume, and number of units is small, because the order cost is approaching the vehicle's limit.
API request (JSON) ⋅ API response ⋅ View on map
Example 1.2
The same as example 1.1, but the maximum number of orders that the vehicle can transport is also specified. The restriction is set using the location.shipment_size.custom.1 and vehicle.capacity.custom.1 parameters. Each vehicle can now carry no more than 5 orders.
The number of orders in three vehicles has changed. Now one vehicle carries one order, and orders cannot be added due to the total cost limit. For the rest, maximum utilization by total cost in each vehicle was achieved, and it was possible to maintain the limit on the number of orders.
API request (JSON) ⋅ API response ⋅ View on map
Example 2
Two vehicles deliver 20 orders. Orders have different lengths. This property is described by two custom units:
- Unit
Length5(location.shipment_size.custom.0) is 1 for orders with a length of 5 meters (these are orders from 10 to 15) and 0 for all other orders. - Unit
Length6(location.shipment_size.custom.1) is 1 for orders with a length of 6 meters (these are orders from 16 to 20) and 0 for all other orders. Orders from 1 to 9 have a length of less than 5 meters. For them, both custom unitsLength5andLength6are 0.
Vehicles have the same load capacity, but different body lengths:
- Vehicle6 has a body length of 6 meters and can transport any orders. For this vehicle,
vehicle.capacity.custom.0andvehicle.capacity.custom.1are both 10 (taking into account the weight of the orders and the vehicle's load capacity). - Vehicle5 has a body length of 5 meters and can't transport orders with a length of 6 meters. For this vehicle,
vehicle.capacity.custom.0= 10, whilevehicle.capacity.custom.1= 0.
In the planned solution, Vehicle5 transports orders that are 5 meters long or less, while Vehicle6 transports orders that are 6 meters long, 5 meters long, or less than 5 meters long.
API request (JSON) ⋅ API response ⋅ View on map
Minimum order size for a vehicle
To prevent a heavy truck from carrying a single small order from one end of the city to the other, set a minimum total size that a vehicle will deliver to a single location. To do this, use the following parameters:
min_stop_weight: Minimum total weight.min_stop_volume: Minimum total volume.min_stop_units: Minimum total size in custom units.
This is relevant when planning freight transportation by vehicles of different capacity. For more information about using vehicles with different capacity, see Transport with different load capacities.
The restriction is soft: the algorithm may violate it. Penalties are set in the fields:
-
penalty.min_stop_weight.fixed: For violating the minimum total weight of the orders in a single location (the default value is 1000). -
penalty.min_stop_weight.kg: For each lacking kilogram in the total weight of the orders delivered to a single location (the default is 50). -
penalty.min_stop_volume.fixed: For violating the minimum total volume of the orders in a single location (the default is 1000). -
penalty.min_stop_volume.cbm: For each lacking cubic meter in the total volume of the orders delivered to a single location (the default is 50). -
penalty.min_stop_units.fixed: For violating the minimum total size in custom units of the orders in a single location (the default is 1000). -
penalty.min_stop_units.unit: For each lacking custom unit in the total size of the orders delivered to a single location (the default is 50).
Example 1.1
Two vehicles with capacities of 1500 and 10,000 kg are delivering orders weighing 100, 500, 900, and 9000 kg. The large truck gets both light and heavy orders.
API request (JSON) ⋅ API response ⋅ View on map
Example 1.2
For a vehicle with a capacity of 10,000 kg, the specified value of min_stop_weight is 1000. As a result, the larger vehicle only gets the order weighing 9000 kg.
API request (JSON) ⋅ API response ⋅ View on map
Example 2.1
A truck and passenger car with capacities of 15 and 1 cubic meter need to deliver 16 orders. The truck gets large orders and a small one.
API request (JSON) ⋅ API response ⋅ View on map
Example 2.2
For a truck with a capacity of 15 cubic meters, the min_stop_volume parameter is set to 1.5. As a result, the truck only delivers large orders.
API request (JSON) ⋅ API response ⋅ View on map
Example 3.1
For a truck and passenger car, the capacity is specified as 8 and 4 custom user units, respectively. The truck gets large orders and a small one.
API request (JSON) ⋅ API response ⋅ View on map
Example 3.2
For a truck, the min_stop_units parameter is set to 1, because small orders are intended for a passenger car. As a result, the truck only delivers large orders.
API request (JSON) ⋅ API response ⋅ View on map
Vehicle properties
You can specify vehicle properties in the vehicle.specs field. The following parameters can be specified:
-
width: Vehicle width in meters. -
height: Vehicle height in meters. -
length: Vehicle length in meters. -
max_weight: Maximum vehicle weight in tons. -
max_weight_kg: Maximum vehicle weight in kilograms (rounded up to the ton when addressing the planning task). -
axle_weight: Maximum load on a vehicle axle in tons.
Note
If you set the vehicle.specs.max_weight and vehicle.specs.max_weight_kg parameters simultaneously in the planning task, the solution will use vehicle.specs.max_weight.
The minimum value is 0 for all the listed properties.
Alert
You can specify these parameters only for trucks (routing_mode = truck).
Vehicle tags
When you set up a vehicle or courier in a request to RouteQ, you can define the rules (or tags) for its compatibility with orders.
Compatibility rules may be required if a vehicle has special equipment that's necessary to fulfil a particular order, like an isothermal van for transporting food.
Vehicle and order compatibility rules (vehicle tags) are set in the following fields:
-
vehicle.tags: The vehicle properties that can partially match the properties required to fulfill the order. -
vehicle.excluded_tags: The vehicle properties that must not match the properties required to fulfill the order.
To set the order tags, use the location.required_tags field in the request.
Alert
The order tags identify the vehicle characteristics that an order requires, whereas vehicle tags define the actual rules for compatibility of a particular vehicle with different orders.
Vehicle tags can be set as strings or regular expressions. Multiple string tags can be separated by commas. In this case, the vehicle can deliver the order if at least one of the listed vehicle tags matches the order tag or if the order has no tags. Regular expressions are used to describe the more complex logic and vehicle/order compatibility rules.
RouteQ uses POSIX Extended regular expression syntax. You can test your regular expressions at Regex101.
Let's look at some real-life cases of using tags.
Example 1
Let's take a use case when a transportation company delivers food and drinks in small bulk quantities. Some foodstuff must be delivered in isothermal trucks only. At the same time, all drinks and some foodstuff can be delivered without refrigerators. In addition, some clients can only accept a cargo if a vehicle is equipped with a tail lift.
To set these order restrictions, specify the following tags in the location.required_tags field:
-
TAIL_LIFT: For orders that can only be unloaded if a vehicle is equipped with a tail lift. -
ISOTHERMAL_TRUCK: For orders containing goods that require temperature-controlled transportation. -
NORMAL_TRUCK: For orders that do not require special conditions of transportation.
To set vehicle features, use the following tags in the vehicle.tags field:
-
TAIL_LIFT: For vehicles equipped with a tail lift. -
ISOTHERMAL_TRUCK: For isothermal vehicles. -
NORMAL_TRUCK: For regular vehicles without an isothermal van.
Note
A vehicle may have one or more tags, or it may not have any at all, depending on its actual configuration. The same rule applies to order tags.
API request (JSON) ⋅ API response ⋅ View on map
Example 2
Let's take a use case when some orders have a restriction on the vehicle body height due to different height of unloading zones.
For example, there are orders with the restriction on body height of 2 meters, 2.3 meters, and 2.5 meters. Then they should have the appropriate tags: Max_200, Max_230, and Max_250.
For the vehicles, tags are set in a more complex way, since a vehicle up to 2 meters high can deliver any orders, whereas a vehicle up to 2.8 meters high can only deliver some orders. That is, if you only use tags, then at a vehicle's height:
-
Up to 2 meters, the
vehicle.tagsfield will contain allMax_200,Max_230, andMax_250values. -
From 2 to 2.3 meters, the
vehicle.tagsfield will contain theMax_230andMax_250values. -
From 2 to 2.3 meters, the
vehicle.tagsfield will contain theMax_250value. -
More than 2.5 meters, the
vehicle.required_tagsfield will be empty.
API request (JSON) ⋅ API response ⋅ View on map
Example 3
Let's take a use case when some orders have a restriction on the arrival of vehicles with a certain load capacity (the OR condition applies when any of the corresponding vehicles is suitable).
For example, there are vehicles with different load capacity: 1, 3, 9, and 15 tons. Let's fix these characteristics using vehicle.tags tags. Because you have to combine these tags when describing orders, let's set them using regular expressions: .*##1TON##.*, .*##3TON##.*, .*##9TON##.* and .*##15TON##.* (.* — means any substring).
The vehicle load capacity limit for some orders is from 1 to 15 tons, from 3 to 9 tons, and from 1 to 3 tons. This limit is set for the order by a string with a regular expression that includes tags of all suitable vehicles. That is, the location.required_tags field will contain the following regular expressions at the required load capacity:
- From 1 to 15 tons:
##1TON##3TON##9TON##15TON##. - From 3 to 9 tons:
##3TON##9TON##. - From 1 to 3 tons:
##1TON##3TON##.
Note
The order tags in example 2 are set by a simple list, because the vehicle must have all the listed tags (AND condition). You have to set at least one of the order tags (OR condition) for the vehicle in example 3. To do this, you can use regular expressions or create separate tags for each possible combination of OR conditions.
API request (JSON) ⋅ API response ⋅ View on map
Optional tags
When planning, you may sometimes need to consider which vehicles are best to use (or avoid) for certain orders. For example, it's better to give VIP orders to specially trained couriers.
For such requirements, there are optional tags. They're listed in the location.optional_tags field. If preferences can't be met, they may be violated (for example, because of weight restrictions or delivery time). That's the difference between optional tags and required vehicle characteristics.
Note
If you'd prefer to have vehicles used in a certain zone, set optional geofences for them.
You can use the location.optional_tags.value tag weight to prioritize your preferences. Its value can be positive or negative. When planning, the optional tag is compared to the tags of the vehicle that is delivering the order. If the tag from location.optional_tags matches a vehicle tag from the following lists:
-
vehicle.tags:valueis deducted from the route cost. -
vehicle.excluded_tags:valueis added to the route cost.
The value that optional tags add to the route cost is returned in the result.routes.metrics.total_optional_tags_cost field (it can be negative).
Example
You need to deliver 10 orders, some of them have the following optional tags:
vip: 6 orders. Its weight varies from 100 to 350 at different points.morning: 3 orders. Its weight at all points is the same — 500.
One of the vehicles has vip and morning tags specified in the vehicle.excluded_tags field. This means that it's best not to give vip-tagged and morning-tagged orders to this courier due to the late start time of the route.
As a result, in most cases the requirements aren't violated: five out of six vip orders are delivered by the courier that doesn't have any limits on the vip tag. There are no violations related to the morning tag.
But one vip order is scheduled for a vehicle with the vip tag in excluded_tags due to capacity restrictions. 100 is returned in the total_optional_tags_cost field for this route: using an "unsuitable" vehicle increased the cost by 100 units. The preference was violated for the order with the lowest location.optional_tags.value weight.
API request (JSON) ⋅ API response ⋅ View on map
Order incompatibility
Orders may have incompatible types, which you can set using the following parameters:
-
options.incompatible_load_types: Sets order incompatibility for all vehicles in the same way. For more information, see the Order incompatibility section. -
vehicle.incompatible_load_types: Sets order incompatibility for a specific vehicle by enabling you to take vehicle features into account. -
vehicle.onboard_incompatible_load_types: When this is set tofalse(by default), order incompatibility remains in effect throughout the entire run, and when the value istrue, then only while the orders are in the vehicle.
Note
The vehicle.incompatible_load_types parameter has a higher priority and completely redefines the options.incompatible_load_types parameters for this vehicle.
For example, different temperature modes are required to transport milk and ice cream. If the vehicle has one compartment, it can transport either milk or ice cream. If the vehicle has two compartments with different temperature modes, it can transport milk and ice cream at the same time in different compartments. In this case, specify the order incompatibility vehicle.incompatible_load_types for vehicles with one compartment. Don't use this parameter for vehicles with two compartments and don't specify incompatible types options.incompatible_load_types for orders in general.
If orders are incompatible for reasons other than vehicle characteristics, set vehicle.onboard_incompatible_load_types = true. For example, if orders from competing companies shouldn't be transported at the same time, the courier will pick up and deliver each company's orders separately without stopping at a depot. This reduces mileage and time en route.
Example 1
The delivery consists of 4 addresses with the following order types:
-
Order 1 (
id= 1):flowers. -
Order 2 (
id= 2):flowers. -
Order 3 (
id= 3):flowers,sweets. -
Order 4 (
id= 4):flowers,ice-cream.
Flowers and sweets are incompatible for delivery in the same vehicle. Moreover, simultaneous delivery of flowers and ice-cream is prohibited for vehicle 2, but simultaneous delivery of flowers and sweets is permitted. Then the solution will contain delivery of orders 2 and 4 in the first vehicle and delivery of orders 1 and 3 in the second vehicle.
API request (JSON) ⋅ API response ⋅ View on map
Example 2.1
You need to have 3 orders from different companies picked up and delivered. Orders 1 and 2 and orders 2 and 3 cannot be delivered together, because they belong to competing companies.
As a result of planning, the courier picks up and delivers orders 1 and 3, then returns to the depot to load and deliver order 2 as part of a new run.
API request (JSON) ⋅ API response ⋅ View on map
Example 2.2
The same as in example 2.1, but vehicle.onboard_incompatible_load_types = true.
As a result of planning, the courier picks up and delivers order 2, and then picks up and delivers orders 1 and 3 without visiting the depot. This means less mileage and time en route.
API request (JSON) ⋅ API response ⋅ View on map
Loaded orders
If the order is already in the vehicle, the courier can immediately start delivery. To run this scenario, specify the parameters in the planned_route field:
|
Parameter |
Description |
Value |
|
|
List of order |
|
|
|
All orders loaded to the vehicle should be serviced during the same run before the vehicle returns to the depot. |
|
|
|
The vehicle will visit all depots in Use if:
|
|
* Specified for depots and orders of the garage type.
Example
Several orders were loaded in the courier's vehicle last night. The courier doesn't have to pick them up at the depot. Therefore, the point of the garage type is specified in the place where the courier will go.
The loaded_orders parameter shows that orders 1 and 2 have been loaded. The courier can immediately deliver them to the destination.
The following parameters are also set in the conditions:
-
planned_runs_first=true. -
delivery_in_current_run=truefor depot and garage.
The courier starts from the garage and immediately delivers orders 1 and 2. They then go to the depot to pick up orders 3 and 4, which they must deliver immediately after loading. After these two deliveries, the courier returns to the depot to pick up orders 5 and 6 and follows the route further.
API request (JSON) ⋅ API response ⋅ View on map
Adjusting the vehicle's moving time
To calculate the speed of a vehicle when building a route, RouteQ uses Yandex Maps data about traffic and the speed factor specified in the request. Although trucks usually move slower in traffic jams, some drivers drive more aggressively and arrive earlier than the calculated timeframes.
To compensate for such deviations, RouteQ has the travel_time_multiplier option where you can specify a fractional value. If the value is 1, the calculation is made for the vehicle with the expected average speed. At smaller values (for example, 0.8), the calculation accounts for faster vehicles. At higher values (for example, 1.2), the calculation accounts for slower vehicles.
Note
The travel_time_multiplier parameter only affects the vehicle speed. The handover time at the delivery point remains the same.
Example 1
In the example below, the routing request is sent without adjusting the transit time. As a result, the vehicle delivers the order in 4 hours and 20 minutes, with 3 hours and 40 minutes spent moving between the points.
API request (JSON) ⋅ API response ⋅ View on map
Example 2
The same as in example 1, but with the travel_time_multiplier parameter set to 0.5. In the resulting route, the courier delivers the order in 2 hours and 25 minutes, spending 1 hour and 45 minutes moving between the points. However, time spent on parking and handover remains unchanged.
API request (JSON) ⋅ API response ⋅ View on map
Example 3
The same as in example 1, but with the travel_time_multiplier parameter set to 2. In the resulting route, the courier delivers the order in 7 hours and 58 minutes, spending 7 hours and 18 minutes moving between the points. Traveling the route takes more than twice as long as in example 1, because part of the route occurs at peak hours, and the vehicle can't drive at the maximum speed. Time spent on parking and handover remains unchanged.
API request (JSON) ⋅ API response ⋅ View on map
Adjusting handling time
In addition to the overall handling time at a depot, the time a courier spends on order handover is also taken into account when calculating the total time spent on this order. Handover time includes parking, riding the elevator, handing over the delivery, and paperwork. This time is considered in the service_duration_s and shared_service_duration_s parameters. However, some couriers spend less time at depots at the route start and complete handovers faster than others. For example:
-
In the case of parallel planning for vehicles and couriers using public transport, couriers who travel by public transport don't have to spend time parking. As a result, they need lower handling time.
-
Some couriers are faster than others. Experienced couriers usually spend less time at depots and on order handovers.
To compensate for the difference in working time, RouteQ has the service_duration_multiplier and shared_service_duration_multiplier parameters that can be specified for couriers. These parameters affect the times a specific courier will spend at a depot and on handling an order. If the value is 1, the handling time matches the time specified in the service_duration or shared_service_duration field and the depot handling time equals the value specified in the service_duration_s parameter for the depot. If the value is less than 1, the handling time and the handling time at the depot are reduced. And if the value is greater than 1, these times are increased.
Note
The service_duration_multiplier and shared_service_duration_multiplier parameters only affect the handling time and handling time at the depot. The transit time between the points remains the same.
Example 1
In the example below, the routing request is sent without adjusting the handling time.
API request (JSON) ⋅ API response ⋅ View on map
Example 2
In the example below, the same request is sent to RouteQ as in example 1, but with the service_duration_multiplier parameter set to 0.5. Order handling and handling time at the depot take half as much time compared to example 1.
API request (JSON) ⋅ API response ⋅ View on map
Example 3
In the example below, the same request is sent to RouteQ as in example 1, but with the service_duration_multiplier parameter set to 2. Order handling and handling time at the depot take twice as much time compared to example 1.
API request (JSON) ⋅ API response ⋅ View on map
Prompt delivery
To build an optimal route, the algorithm minimizes the wait time between route points. But there are cases when it's useful to shift delivery to an earlier time. For example:
- You have to minimize the risk of late arrival.
- It's more comfortable for the courier to travel in the daytime.
To deliver goods as early as possible, use the penalty.arrival_after_start penalty, which consists of two parameters:
average_h: Sets the penalty amount for the average arrival time after the start of the time window. When using the option, we always recommend specifying this value.as_soon_as_possible: Determines whether to start the route as early as possible. The parameter takes the valuetrueorfalse(by default). It is specified in addition toaverage_h.
Note
The algorithm can shift the start and arrival time of a vehicle only if the flexible start time is enabled for the depot.
If you don't use the penalty.arrival_after_start penalty, the route will be built with the minimal wait time between points and the latest possible start time from the depot.
When using the penalty, the algorithm will build routes to start them earlier, provided it doesn't reduce quality.
If the route must start as early as possible (even if it causes additional waiting), specify penalty.arrival_after_start.as_soon_as_possible = true.
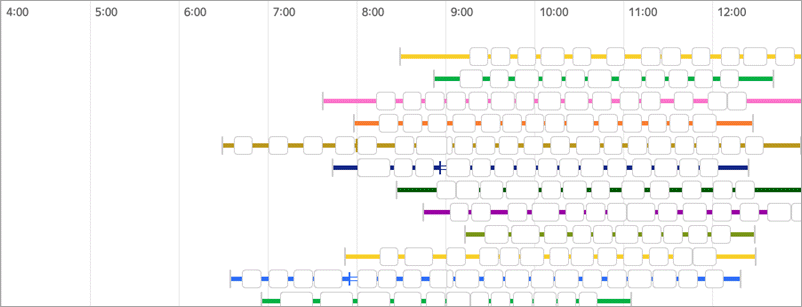
Example 1
The route includes 4 orders with different time windows. The earliest start of the time window for order 5 is 08:00. The courier starts from the depot at 11:02 and arrives at the first delivery point at 11:40. Order 5 is delivered at 12:59.
API request (JSON) ⋅ API response ⋅ View on map
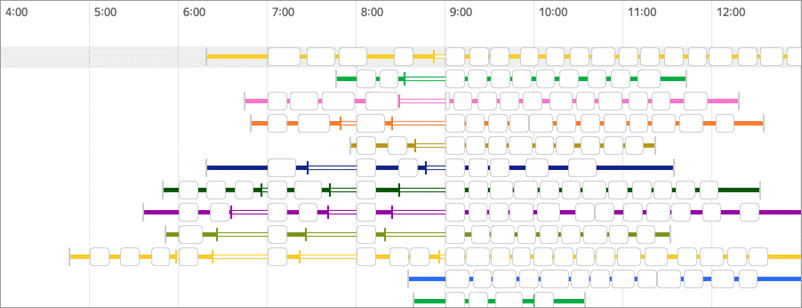
Example 2
The same data is used as in example 1, but the penalty is set for the average arrival time after the start of the time window using the penalty.arrival_after_start.average_h parameter. The courier starts from the depot at 06:59, waits for 8 minutes, and then delivers the earliest order (order 5) at 08:00.
API request (JSON) ⋅ API response ⋅ View on map
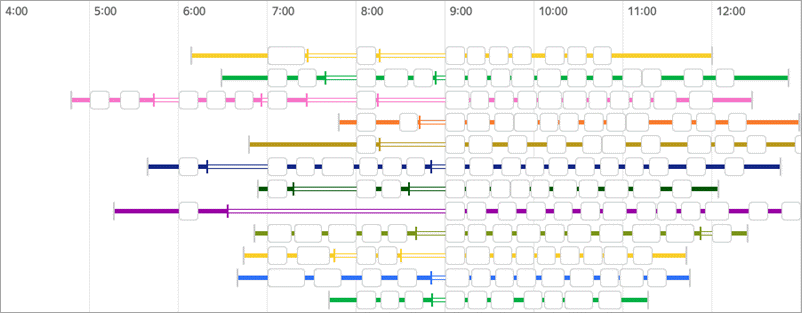
Example 3
The same data is used as in example 2, but the penalty.arrival_after_start.as_soon_as_possible = true parameter is additionally set. The courier starts from the depot at 06:00, waits for 1 hour and 7 minutes, and delivers the earliest order (order 5) at 08:00.
API request (JSON) ⋅ API response ⋅ View on map
Trailers
A trailer is a truck with a trailer attached. Orders can be placed in both the truck and trailer. An order can be partially loaded in the truck and in the trailer.
To describe the trailer, use the trailer object.
|
Field |
Description |
|
|
The trailer carrying capacity is described by the fields:
Added to the truck's carrying capacity. |
|
|
Amount of custom units a trailer can carry. Carrying capacity in custom units is set in
If the unit name is present in deliveries or other vehicles, but not in this one, the capacity is assumed to be unlimited. |
|
|
The trailer loading limit is described by the fields:
|
|
|
The trailer dimensions are described by the fields:
The values are expressed in meters. * Required parameter |
|
|
Trailer volume in cubic meters. If both metric dimensions and volume are specified for the trailer, then |
|
|
The maximum difference in the load of the trailer and the truck is described by the following fields:
If one of the fields is omitted, there are no restrictions on it. There are physical limitations to the difference between the trailer load and the truck load. If the truck is empty and the trailer is heavy, the vehicle becomes uncontrollable and can't be driven. |
|
|
The maximum allowable difference in the quantity of custom units loaded in the trailer and the truck. The permissible difference in custom units is set in
If the unit name is present in deliveries or other vehicles, but not in this one, there is no restriction. |
|
|
The trailer cost is described by the fields:
Added to the cost of the truck if the trailer is used. |
|
|
Time to decouple the trailer in seconds. Only for orders with the |
|
|
Time to couple the trailer in seconds. Only for orders with the |
|
|
Penalty for each reloading* of cargo from the trailer to the truck. * Reloading means moving orders from a trailer to the truck to deliver them to non-accessible locations (see Using a trailer). |
|
|
The time for reloading cargo from the trailer to the truck, set in seconds. It can be described by the following fields:
If multiple time types are specified, use the one that spends the most time. If no type is specified, use only the fixed time.
|
Sample trailer description in a request:
{
    "trailer": {
        "capacity": {
            "weight_kg": 10000,
            "units": 200
        },
        "max_capacity_difference": {
            "units": 10,
            "weight_kg": 0
        },
        "cost": {
            "fixed": 1000,
            "km": 10
        },
        "decoupling_time_s": 300,
        "coupling_time_s": 300,
        "rolling_time": {
            "fixed_time_s": 3000
        }
    }
}
For more information about using a truck with a trailer, see Using a trailer.
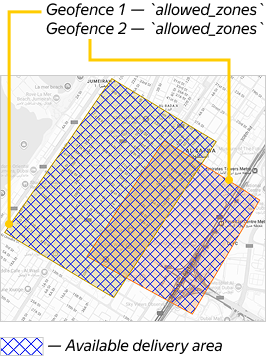
Setting geofences
When planning routes for vehicles, you can set delivery zone restrictions (geofences).
You can set geofences within which the vehicle can deliver orders in the Allowed geofences field on the Vehicles sheet (vehicles.allowed_zones in the API):
-
The vehicle can deliver orders within any geofences specified in this field.
-
If you don't specify allowed geofences, the courier can deliver orders without restrictions.
-
The order can't be delivered if all couriers have allowed geofences specified and the order location doesn't fall within any of them.
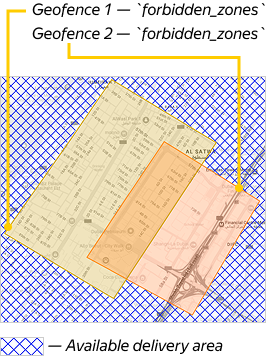
Geofences restricted for delivery are set in the field Forbidden geofences (vehicle.forbidden_zones in the API). The courier can't deliver orders to within geofences specified in this field.
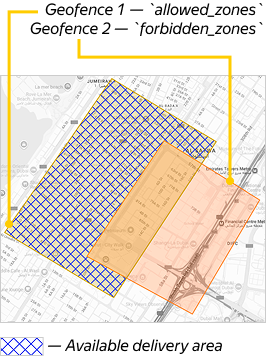
If the delivery location is where geofences overlap, there may be multiple delivery scenarios. Note that the Forbidden geofences field values (vehicle.forbidden_zones) take priority over Allowed geofences field values (vehicle.allowed_zones).
|
Geofence 1 |
Geofence 2 |
Comments |
|
|
|
The vehicle can deliver orders in any geofences, including where they overlap Permitted delivery zone
|
|
|
|
The vehicle can deliver orders in Geofence 1 but can't deliver orders in Geofence 2 or where Geofence 1 and Geofence 2 overlap Permitted delivery zone
|
|
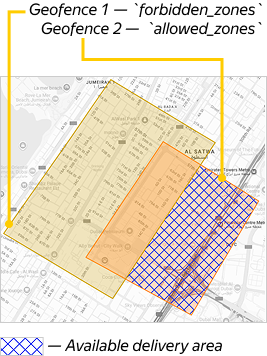
|
|
The vehicle can deliver orders in Geofence 2 but can't deliver orders in Geofence 1 or where Geofence 1 and Geofence 2 overlap Permitted delivery zone
|
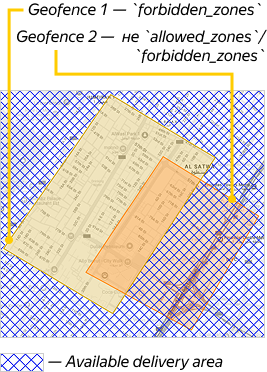
|
|
Not marked as |
The vehicle can't deliver orders in Geofence 1 or where Geofence 1 and Geofence 2 overlap, but can deliver orders in Geofence 2 outside the overlap Permitted delivery zone
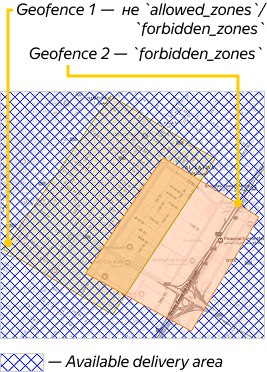
|
|
Not marked as |
|
The vehicle can't deliver orders in Geofence 2 or where Geofence 1 and Geofenc 2 overlap, but can deliver orders in Geofence 1 outside the overlap Permitted delivery zone
|
|
|
|
The vehicle can't deliver orders in any of these geofences or where they overlap Permitted delivery zone
|
Couriers can't make deliveries within geofences specified in vehicle.forbidden_zones, but they can travel through them.
If certain geofences are forbidden for all couriers, use the global option options.avoid_zones. On the contrary, couriers are restricted from even entering the geofences specified in options.avoid_zones. For more information, see Excluded geofences.
When orders are being assigned, geofence incompatibility is taken into account: both the global option and the values set for individual couriers. When planning routes, you can also cancel all limits related to geofences.
Example
The example features 4 orders, 2 vehicles, and 4 geofences specified in the interface. Coordinates automatically determine how orders pertain to geofences:
-
Order 1 — simultaneously in
zone1andzone2. -
Order 2 — in
zone1. -
Order 3 — simultaneously in
zone2andzone3. -
Order 4 — in
zone4.
The availability of geofences for vehicles determined:
|
The courier's username. |
Allowed geofences ( |
Forbidden geofences ( |
|
Vehicle 1 |
|
|
|
Vehicle 2 |
Geofences not determined |
|
As a result, Vehicle 1 delivers Orders 1 and 2, Vehicle 2 delivers Order 4. And Order 3 remains unassigned, because its address is located in the geofences forbidden for both vehicles.
API request (JSON) ⋅ API response ⋅ View on map
Optional geofences
Optional geofences can be used to distribute orders between vehicles. They help designate zones that are preferred for visiting (high-priority and low-priority). You can set one or more such geofences for each vehicle.
Optional geofences represent a soft restriction. You can define them in the vehicle.optional_zones array:
-
optional_zones.N.zone: Geofence name. -
optional_zones.N.value, if this parameter is:- Greater than 0: The vehicle receives a bonus for each order delivered within the geofence (this value is subtracted from the route cost).
- Less than 0: The value is treated as a penalty and added to the route cost.
We recommend using values less than or equal to 0 because too many bonuses may result in a negative route cost.
If you want the route cost to include a value for visiting a geofence and not for each order within it, use the following expression in the advanced cost settings:
(has_order(in_zone('Zone')) * 1000) — if a route contains an order in Zone, this expression returns 1000.
Example 1
Two couriers need to complete 10 orders. Each vehicle can carry up to 5 orders.
The first courier should avoid the optional geofence MSK-1, and the second, MSK-2. Visiting these geofences incurs a penalty of 1000 units.
Orders 1, 2, and 3 are in geofence MSK-1. All other orders are in MSK-2.
In the resulting plan, the first courier delivers 5 orders within geofence MSK-2 and incurs no penalties. The second courier delivers orders 1–3 in geofence MSK-1 and orders 6 and 9 in geofence MSK-2, incurring a total penalty of 2000 units (1000 units for each order delivered in the undesired geofence).
API request (JSON) ⋅ API response ⋅ View on map
Example 2
The conditions are the same as in Example 1, except:
- The first vehicle can carry 7 orders, and the second, 3 orders.
- For visiting optional geofence
MSK-1, the first courier receives no bonus. - For visiting optional geofence
MSK-2, the second courier incurs a penalty of 10,000 units.
In the resulting plan, the first courier delivers orders 4–10 in geofence MSK-2, and the second delivers orders 1–3 in geofence MSK-1. Neither courier receives any bonuses or penalties.
API request (JSON) ⋅ API response ⋅ View on map
Incompatible geofences
You can set geofence incompatibility in order to prevent orders belonging to different delivery zones from ending up part of the same courier run.
Using the vehicles.incompatible_zones parameter, the list of such zones can be set both for the entire solution and for a specific courier. Incompatible zones defined for the courier take precedence over globally defined zones. In order for the global restriction options.incompatible_zones not to apply to the courier, set an empty list in the vehicles.incompatible_zones field.
Example
Each of the three couriers must deliver 4 orders to different parts of the city: northwest, southwest, northeast, and southeast. These areas correspond to the following geofences defined during planning: Northwest, Southwest, Northeast, Southeast.
Global geofence incompatibility has been set: southern zones (Southwest and Southeast) are incompatible with the northern ones (Northwest and Northeast). Additionally, two couriers have the vehicles.incompatible_zones parameter set for them: for the first courier, it contains an empty list, and for the second, it makes the western zones (Northwest and Southwest) incompatible with the eastern ones (Northeast and Southeast).
As a result of planning:
Courier 1is unaffected by the global incompatibility, and all the 4 orders from different zones get included in their run.Courier 2is subject to the zone incompatibility restrictions set for them in thevehicles.incompatible_zonesparameter: one run includes orders to the eastern zones, and the other, to the western ones.Courier 3is subject to the global restrictions: orders to the southern and northern zones get assigned to different runs.
API request (JSON) ⋅ API response ⋅ View on map