Import window
Steps
Step 1. Enter the data
On the Planning tab, choose one of the options:
Click the Upload file button or drag the document into the window to upload the data that you prepared in an Excel file.
Click the Start planning button to enter the data directly on the interface tabs. Before you start planning a task, you can switch between tabs and make changes.
Step 2. Fix the errors and check the warnings.
Next to the tab names, you can see the icons reflecting the status of the uploaded data: If the system detects errors in the source data, information about this appears in the list of comments next to the table. Click on the message in the list to highlight the problem cell.
 : The data is correct.
 : You have errors that must be resolved before planning.
 : You have warnings but can still run Planning.
Step 3. Define the optimization settings
Set the appropriate settings for the current planning task.
| Name | Description |
|---|---|
| Time zone | The time zone used for all the time windows. |
| Consider geofences | Choose Yes to match the orders with geofences from the Geofence list automatically using coordinates. The planning will take into account geofence restrictions. Choose No to ignore geofences. |
| Solution quality | Sets the quality of the solution. The Fast option is good for quickly checking the solution for errors. Optimal is best for planning a real route. |
Step 4. Run the planning
On the Settings tab, click the Plan button. The button is enabled if there are no errors in the data.
When the task solution is ready, the planning result opens. You can view and edit it.
Managing data in the interface
Adding data
In the Download template list, you can find the files with filled-in data to use for the test planning (see also the Planning example section).
To add data:
Copy data from Excel by clicking Upload file.
Extend the contents of one cell in a range by dragging the selection frame over a column.
Editing data
Edit cell values by double-clicking the left mouse button.
Delete, insert, and copy rows using the context menu available on right-click in a row.
Sorting
To sort data by column:
- Right-click any table cell and choose Sort table.
- Click the column name.
Filling in the tabs
| Tab | Explanation | Visible by default | Instruction for Excel |
|---|---|---|---|
| Orders | Add information about delivery points, order pickup, or start/end route points. Required fields:
|  | Orders sheet |
| Depots | Add information about the depot location and opening hours, details about the route start and end points. Required fields:
| | Depot sheet |
| Map | The tab shows the map and a list of delivery addresses. For details, see the Map section. | | None. It can only be filled out in the interface |
| Vehicle | Add information about company vehicles, their dimensions, and shift duration. To use vehicles previously added to Master data in planning, disable the Transport from an Excel file option. The required field is the vehicle ID. | | Vehicles sheet |
| Incompatible | Add information about cargo types and their incompatibility with one another. |  | Incompatible order types sheet |
| Groups | Add information about orders that need to be delivered by one courier. Location IDs is a required field. | | Location groups sheet |
| Adv. settings | Fill in the list of routing options. | | Options sheet |
| Routes | Add information about predefined routes. Required fields:
| | Routes sheet |
| Settings | Specify additional route parameters, such as date, time zone, and transportation method. For more information, see Settings. | | None. It can only be filled out in the interface |
| Tab | Explanation | Visible by default | Instruction for Excel |
|---|---|---|---|
| Orders | Add information about delivery points, order pickup, or start/end route points. Required fields:
| | Orders sheet |
| Depots | Add information about the depot location and opening hours, details about the route start and end points. Required fields:
| | Depot sheet |
| Map | The tab shows the map and a list of delivery addresses. For details, see the Map section. | | None. It can only be filled out in the interface |
| Vehicle | Add information about company vehicles, their dimensions, and shift duration. To use vehicles previously added to Master data in planning, disable the Transport from an Excel file option. The required field is the vehicle ID. | | Vehicles sheet |
| Incompatible | Add information about cargo types and their incompatibility with one another. | | Incompatible order types sheet |
| Groups | Add information about orders that need to be delivered by one courier. Location IDs is a required field. | | Location groups sheet |
| Adv. settings | Fill in the list of routing options. | | Options sheet |
| Routes | Add information about predefined routes. Required fields:
| | Routes sheet |
| Settings | Specify additional route parameters, such as date, time zone, and transportation method. For more information, see Settings. | | None. It can only be filled out in the interface |
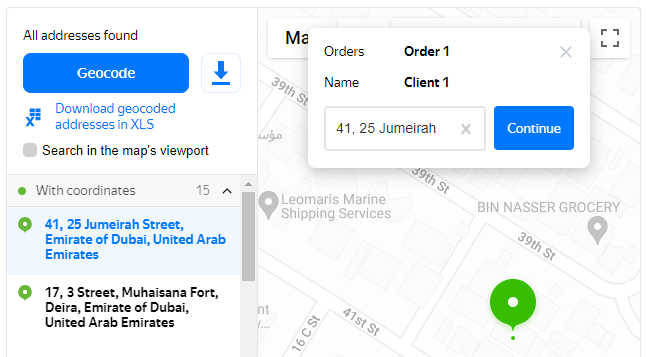
Map
The tab contains:
The map.
A list of order or depot addresses.
A link for downloading geocoded data in Excel format.
Here, use the geocoder to process addresses. It determines the latitude and longitude of each address. Geocoding can be started automatically or manually.
Geocoding only works for uploading orders and depots from Excel files. When using the API, you need to pass point coordinates rather than addresses. This means that you must geocode in advance on the side of the integrated system.
There are two types of geocoding:
Automatic geocoding
To start geocoding, fill in the address box (write the recipient's address) for every order on the Orders sheet.
Automatic geocoding starts immediately after you upload the data file to the interface. But if the file has a lot of addresses without coordinates, you may need to click Find coordinates to start geocoding.
If the recipient's address indicates the apartment number, automatic geocoding determines the coordinates of the building entrance where the courier has to arrive. Entrance coordinate data isn't available for all addresses yet, but the database is constantly being updated.
To get more accurate results, enable the Search in the map's viewport option. It's useful if:
The address is incomplete. For example, the city isn't specified.
You need to set non-standard borders for address search.
You need to split geocoding into several steps, changing the scope at different iterations.
How to break down geocoding into steps
- Stop geocoding by clicking Stop.
- Enable the Search in the map's viewport option.
- Move the map's viewport to the necessary position.
- Set the scale.
- Click Search by address again.
Automatic geocoding results
When geocoding is completed, the following address groups appear to the left of the map: With coordinates, Without coordinates, and Approximation. There can be one or more groups.
Addresses are divided into groups depending on how correct the source data is in the uploaded file. All found addresses are marked on the map using color labels.
| Placemark color | Group | Property | Example |
|---|---|---|---|
 | With coordinates | The address is entered in the correct format and without errors. | Moscow, Pyatnitskoe highway, 23k2 |
 | Approximation | The address is entered in an incorrect format. | 26Bc2, Moscow, Bolshaya, Pochtovaya street |
| The address is entered with errors or contains information that isn't related to the address. | Moscow region, Bhgrrkha, Tereshkova street, 13 | ||
| The address doesn't specify the city (different cities may have the same street names). | Okruzhnaya street, 8 | ||
The address in text format (the address field) and coordinates (the point.lat and point.lon fields) don't match. | 22.0 and 33.1, Moscow, Vysokovoltny passage, 1s36 | ||
| The building was not found (but the system found a building with a number that's close to the necessary one or only the street). | Moscow, Bolshaya, Pochtovaya street, 5559 and Moscow, Bolshaya, Pochtovaya Street, 55/59 | ||
 | Without coordinates | The address field isn't filled in. | Empty |
| The street wasn't found, and only the coordinates of the city center are returned. | Moscow, Ulichnaya street, 8 |
| Placemark color | Group | Property | Example |
|---|---|---|---|
| With coordinates | The address is entered in the correct format and without errors. | Moscow, Pyatnitskoe highway, 23k2 |
| Approximation | The address is entered in an incorrect format. | 26Bc2, Moscow, Bolshaya, Pochtovaya street |
| The address is entered with errors or contains information that isn't related to the address. | Moscow region, Bhgrrkha, Tereshkova street, 13 | ||
| The address doesn't specify the city (different cities may have the same street names). | Okruzhnaya street, 8 | ||
The address in text format (the address field) and coordinates (the point.lat and point.lon fields) don't match. | 22.0 and 33.1, Moscow, Vysokovoltny passage, 1s36 | ||
| The building was not found (but the system found a building with a number that's close to the necessary one or only the street). | Moscow, Bolshaya, Pochtovaya street, 5559 and Moscow, Bolshaya, Pochtovaya Street, 55/59 | ||
| Without coordinates | The address field isn't filled in. | Empty |
| The street wasn't found, and only the coordinates of the city center are returned. | Moscow, Ulichnaya street, 8 |
You need to manually check whether the addresses in the Approximation group have the correct coordinates.
You may also need to check the addresses in the With coordinates group. For example, there may be a typo in the coordinates box. In that case, the order location will be thousands of kilometers from the main group of orders. To find such an error, you need to zoom out on the map a lot.
Automatic geocoding features
The default search area covers ±1 degree from the depot coordinates.
The geocoder may determine the order coordinates incorrectly if the address is set inaccurately (for example, without specifying the city), and there is the same street and building number in a neighboring locality. To avoid this, choose the scale and location on the map to display the desired point.
The map parameters are stored locally for the company and used for the next planning. To make geocoding more accurate, enable the Search in the map's viewport option.
Manual geocoding
To assign coordinates to a point manually:
- Click the address in the list next to the map.
- A window and (for the Approximation and With coordinates groups) a pin that marks the order address appear on the map. There are two ways to edit the address:
Dialog window. In the dialog window that appears, start entering or editing the address, then select the appropriate option in the drop-down list.
Pin. Click the pin and drag it to the correct location on the map. The address in the window changes. Switch layers, if you need to get a better view of the area.
- The pin and address in the list are marked green.
- Click Continue to go to the next address in your list.
Save the results
To save the geocoding result to a file, click Export geocoded addresses to Excel. In the downloaded file, every order address has the exact coordinates based on the results of automatic and manual geocoding. You can use them for further planning.
If any orders are left without coordinates as a result of planning, you can save them and exclude them from planning. To do this, click  → Download orders without coordinates and remove them from planning.